Simple and easily disabled (User can kill the processes)
PROMPT_COMMAND='history -a >(logger -t "[$USER] $SSH_CONNECTION")'
More complex, but user won't be able to stop it
Add this line to your pam configuartion for whatever service you'd like to track (All users). Also, the auditd service needs to be running.
session required pam_tty_audit.so enable=*
Or, disable it for some users, only enable it for some. The command also has log_passwd which will catch hidden input fields like passwords.
session required pam_tty_audit.so disable=username,anotheruser enable=username log_passwd
Then run the following command to view the results. It's a bit ugly and shows users by UID, but it works.
aureport --tty
Fix a file that won't seek on Plex
ffmpeg -err_detect ignore_err -i source.mkv -c copy dest.mkv
Convert a file to x265 and your default audio codec (libvorbis if it's installed)
ffmpeg -i source.mkv -c:v libx265 -vtag hvc1 dest.mkv
Convert a file to x265 leaving audio the same codec
ffmpeg -i source.mkv -c:v libx265 -vtag hvc1 -c:a copy dest.mkv
Update 2023-06-23 - This works without stunnel if you can get bind 9.19!
tls myTLS-DoT {
    ca-file "/etc/bind/ca.crt";
    key-file "/etc/bind/my_client.key";
    cert-file "/etc/bind/my_client.crt";
    remote-hostname "remote_server";
};
options {
        forwarders port 853 tls myTLS-DoT {
            1.2.3.4;
	};
};
I was looking to do DNS over TLS for my home environment, but I wanted to run the endpoints on cloud servers that I don't want others to use. My home IP changes very frequently and so I didn't want to do a whitelist approach, so my next thought was TLS client certificate auth.
I already use pihole for add filtering, so I wanted it to tie into that as well.
I came up with something that works, but is super convoluted. There is most likely a better way to do this, but I went through a few iterations and this worked.
The flow ended up looking like this:
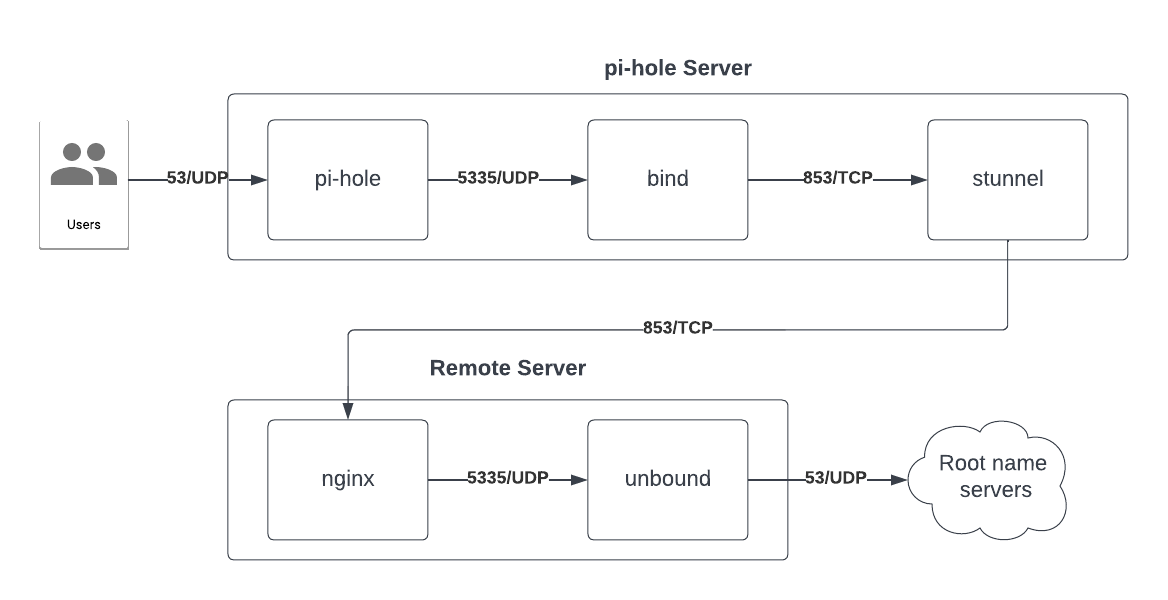
I did this all on Rocky Linux 8/9 and Debian 11. The configs for Rocky Linux don't differ between 8/9, but do slightly on Debian 11 as bind is layed out differently.
Pi-hole server configuration
Rocky Linux
dnf install bind stunnel
Debian 11
apt install stunnel4 bind9
Configure bind
I changed/added a few things, but mostly defaults. Changed/added are in bold. This makes bind listen on port 5335 and forward all requests to 127.0.0.1 on port 853 TCP.
Rocky Linux
/etc/named.conf
options {
        listen-on port 5335 { 127.0.0.1; };
        listen-on-v6 port 5335 { ::1; };
        directory       "/var/named";
        dump-file       "/var/named/data/cache_dump.db";
        statistics-file "/var/named/data/named_stats.txt";
        memstatistics-file "/var/named/data/named_mem_stats.txt";
        secroots-file   "/var/named/data/named.secroots";
        recursing-file  "/var/named/data/named.recursing";
        allow-query     { localhost; };

        recursion yes;

        dnssec-enable yes;
        dnssec-validation yes;
        forward only;
        forwarders {
                127.0.0.1 port 853;
        };

        managed-keys-directory "/var/named/dynamic";

        pid-file "/run/named/named.pid";
        session-keyfile "/run/named/session.key";

        /* https://fedoraproject.org/wiki/Changes/CryptoPolicy */
        include "/etc/crypto-policies/back-ends/bind.config";
};

server 127.0.0.1 {
        tcp-only yes;
};
Debian 11
/etc/bind/named.conf.options
options {
        listen-on port 5335 { 127.0.0.1; };
        listen-on-v6 port 5335 { ::1; };
        directory "/var/cache/bind";
        allow-query     { localhost; };

        recursion yes;

        dnssec-enable no;
        dnssec-validation no;


        forward only;
        forwarders {
                127.0.0.1 port 853;
        };
};
server 127.0.0.1 {
        tcp-only yes;
};
systemctl enable named --now
Configure stunnel
You will need certificates for every pihole server involved. You can use
Easy-RSA to set up something pretty quickly.
Once you initialize the pki and generate a CA, you can generate a client cert:
./easyrsa build-client-full server_name nopass
Copy the pki/ca.crt, pki/issued/server_name.crt, and pki/private/server_name.key generated to /etc/stunnel/.
Generate a cert/key for nginx.
./easyrsa build-client-full remote_server_name nopass
cat pki/issued/remote_server_name.crt ca.crt > remote_server_name_combined.crt
Copy the cert created with cat and the pki/private/remote_server_name.key to the remote server at /etc/nginx/.
Swap nobody for the setuid, setgid, and chown to stunnel4 for Debian 11 in the following commands/config.
mkdir /run/stunnel && chown nobody /run/stunnel
/etc/stunnel/stunnel.conf
sslVersion = TLSv1.3
setuid = nobody
setgid = nobody
socket = l:TCP_NODELAY=1
socket = r:TCP_NODELAY=1
pid = /run/stunnel/stunnel.pid


[dns]
client = yes
accept = 127.0.0.1:853
connect = remote_server:853
#connect = another_server:853
#failover = rr
verifyChain = yes
CAFile = /etc/stunnel/ca.crt
cert = /etc/stunnel/pihole.crt
key = /etc/stunnel/pihole.key
Rocky Linux
systemctl enable stunnel --now
Debian 11
systemctl enable stunnel4 --now
Configure pi-hole
Modify the PIHOLE_DNS_1 variable to be localhost.
/etc/pihole/setupVars.conf
PIHOLE_DNS_1=127.0.0.1#5335
Tell pi-hole to reconfigure and select repair as the option.
pihole -r
Remote server configuration
Configure nginx
Rocky Linux
dnf install nginx
Debian 11
apt install nginx
Copy the ca.crt that you put in /etc/stunnel/ca.crt to your remote server in /etc/nginx/
Add this to the bottom of your nginx.conf. This requires the
nginx-mod-stream nginx module.
/etc/nginx/nginx.conf
stream {
        upstream dns {
                zone dns 64k;
                server 127.0.0.1:5335;
        }

        server {
                listen 853 ssl;
                ssl_certificate /etc/nginx/remote_server_name_combined.crt;
                ssl_certificate_key /etc/nginx/remote_server_name.key;
                ssl_client_certificate /etc/nginx/ca.crt;
                ssl_verify_client on;
                ssl_session_timeout 5m;
                ssl_protocols TLSv1.3;
                ssl_prefer_server_ciphers off;
                ssl_session_cache shared:SSL2:10m;
                ssl_session_tickets off;
                proxy_pass dns;
        }
}
systemctl enable nginx --now
Configure unbound
Rocky Linux
dnf install unbound
Debian 11
apt install unbound
mkdir /var/log/unbound && chown unbound. /var/log/unbound
server:
    logfile: "/var/log/unbound/unbound.log"
    verbosity: 1
    log-queries: yes
    interface: 127.0.0.1
    port: 5335
    do-ip4: yes
    do-udp: yes
    do-tcp: yes
    do-ip6: yes
    prefer-ip6: no
    harden-glue: yes
    harden-dnssec-stripped: yes
    use-caps-for-id: no
    edns-buffer-size: 1232
    prefetch: yes
    num-threads: 1
    so-rcvbuf: 1m
systemctl enable unbound --now
Testing
Pi-hole server
Test stunnel -> nginx
dig whoami.akamai.net @127.0.0.1 -p 853 +tcp
Test bind -> stunnel
dig google.com @127.0.0.1 -p 5335
Test pihole -> bind
dig google.com @127.0.0.1
Remote server
Test unbound
dig whoami.akamai.net @127.0.0.1 -p 5335
I am migrating my environment from oVirt to Proxmox and wanted to convert my disks to qcow2.
First, shut down the VM you are wanting to migrate.
In the oVirt Virtualization Manager go to Storage -> Disks and find the disk(s) associated with the VM you want to migrate.
Locate the ID column and copy that text. (Ctrl+C as right-click does other things)
ssh to an oVirt node and run the following replacing
DISK_ID with the ID you selected. If this returns more than one line you probably have snapshots that need to be deleted before this will work.
DISK_PATH=$(for i in $(find /rhev/data-center/mnt -type d -name DISK_ID); do echo -n "$i/"; ls --ignore="*.*" $i/; done)
Replace /mnt/tmp with wherever has enough space to hold the image and will be easily accessible from a Proxmox host. I placed mine on an NFS mount that was accessible to both machines.
qemu-img convert -p - fraw -O qcow2 $DISK_PATH /mnt/tmp/vm_name-disk1.qcow2
Create a VM in Proxmox with the specs wanted and once it's created detach and remove it's disk(s). Note the VM ID for use in the next command and replace
VM_ID with it. Also replace the
STORAGE_ID with the id of the storage you wish to place it on.
qm importdisk VM_ID /mnt/tmp/vm_name-disk1.qcow2 STORAGE_ID
If you've tried to delete a namespace but it hangs around forever you can delete it with a little work. I've provided a script at the end to do this.
A stuck namespace will look like this:
kubectl get ns
NAME                        STATUS        AGE
stuck-ns                    Terminating   1d3h
First, get the stuck namespace information
kubectl get ns stuck-ns -o json < stuck-ns.json
Open the file with your favorite editor and delete everything from the file below the metadata section except the name tag. Make sure to get rid of the comma on the end of the metadata curly brace because json.
{
	"apiVersion": "v1",
	"kind": "Namespace",
	"metadata": {
		"name": "stuck-ns"
	}
}
Run a kubectl proxy so you can get direct access to the API (I background it here, but you can also just run it on another tab)
kubectl proxy &
Run a curl to tell it to finalize the deletion making sure to replace the name of the namespace in the URI.
curl -k -H "Content-Type: application/json" -X PUT --data-binary @stuck-ns.json http://127.0.0.1:8001/api/v1/namespaces/stuck-ns/finalize
Script to do all this work for you.
#!/bin/bash
if [ $# -lt 1 ]; then
        echo "$(basename $0) namespace"
        exit 1
fi
namespace=$1

kubectl proxy &
proxypid=$!

json="{
        \"apiVersion\": \"v1\",
        \"kind\": \"Namespace\",
        \"metadata\": {
        \"name\": \"$namespace\"
         }
 }"
echo $json < /tmp/del_namespace.json
curl -k -H "Content-Type: application/json" -X PUT --data-binary @/tmp/del_namespace.json http://127.0.0.1:8001/api/v1/namespaces/$namespace/finalize
kill $proxypid
Upload the certificates to the config map and get the key hash.
kubeadm init phase upload-certs --upload-certs
Output should look like:
[upload-certs] Storing the certificates in Secret "kubeadm-certs" in the "kube-system" Namespace
[upload-certs] Using certificate key:
<hash>
kubeadm token create --print-join-command
The output will be like this:
kubeadm join <cluster_ip>:6443 --token <token_id> --discovery-token-ca-cert-hash sha256:<hash>
Take that output and add the following parameters.
--control-plane --certificate-key <Hash from Step 1>
If you are running Kuberentes 1.24 or just not using Docker you may need to add a command to use your CRI. This is for containerd:
--cri-socket unix:///run/containerd/containerd.sock
Kubernetes is deprecating using docker as a runtime as of 1.24
A little background: I have a Kubernetes cluster with the masters running on Raspberry Pis running Raspbian and the workers on Intel NUCs running CentOS 7.
--------You can ignore this section if you aren't running Raspberry Pis--------
My Raspberry Pis were running kernel 4.19.75-v7l+ and was hitting a
bug trying to do this conversion in kernel <4.14.159 or <4.19.89. I was getting the following error:
failed to "StartContainer" for "etcd" with RunContainerError: "failed to create containerd task: OCI runtime create failed: container_linux.go:349: starting container process caused \"process_linux.go:449: container init caused \\\"process_linux.go:415: setting cgroup config for procHooks process caused \\\\\\\"failed to write \\\\\\\\\\\\\\\"100000\\\\\\\\\\\\\\\" to \\\\\\\\\\\\\\\"/sys/fs/cgroup/cpu,cpuacct/system.slice/containerd.service/kubepods-besteffort-pod624587c2245d85257936b6b4eeee084f.slice:cri-containerd:56614f4494d205c14a16e47715d68fea52c62d6d4d0f99d51d83658bff0e7f10/cpu.cfs_period_us\\\\\\\\\\\\\\\":
To fix this, I had to run rpi-update to get a new kernel and modify the /boot/cmdline.txt to include the following and reboot.
cgroup_enable=cpuset cgroup_memory=1 cgroup_enable=memory
Nothing needed to be done on CentOS for the kernel
--------End Raspberry Pi section--------
First thing to do is to drain the node you want to work on
kubectl drain node4 --ignore-daemonsets --delete-local-data
Once your node is drained you can convert.
Now we need to stop and remove docker from the box
systemctl stop docker
Debian:
apt-get remove docker-ce docker-ce-cli
CentOS:
yum remove docker-ce docker-ce-cli
Debian only: I then did an install of containerd to ensure it was there and tracked as a package I installed.
apt-get install containerd.io
Generate a default config for containerd beyond what is there by default
containerd config default > /etc/containerd/config.toml
systemctl restart containerd
Now edit kubelet to use containerd, modify /var/lib/kubelet/kubeadm-flags.env add the following to the end of KUBELET_KUBEADM_ARGS
--container-runtime=remote --container-runtime-endpoint=unix:///run/containerd/containerd.sock
systemctl restart kubelet
You will also need to change the node annotation from using the docker CRI if you used kubeadm on all nodes
kubectl annotate node node4 --overwrite kubeadm.alpha.kubernetes.io/cri-socket=unix:///run/containerd/containerd.sock
Once I had done that, the apiserver and other master-node services started up without docker running.
You can verify things are running by checking the containers with (Images, containers and other things are namespaced with containerd):
ctr -n k8s.io container ls
If you are adding a new node to the cluster with just containerd you will need to modify the system a bit since Docker isn't there
cat <<EOF | sudo tee /etc/modules-load.d/containerd.conf
overlay
br_netfilter
EOF

modprobe overlay
modprobe br_netfilter

# Setup required sysctl params, these persist across reboots.
cat <<EOF | sudo tee /etc/sysctl.d/99-kubernetes-cri.conf
net.bridge.bridge-nf-call-iptables  = 1
net.ipv4.ip_forward                 = 1
net.bridge.bridge-nf-call-ip6tables = 1
EOF

# Apply sysctl params without reboot
sudo sysctl --system
In order to run a manual command against etcd running inside the K8S cluster you have to pass a few flags
Be very careful with this as you can really mess things up
Get the members of the etcd cluster
kubectl exec -it -n kube-system etcd-k8sn1 -- etcdctl --cacert=/etc/kubernetes/pki/etcd/ca.crt --cert=/etc/kubernetes/pki/etcd/peer.crt --key=/etc/kubernetes/pki/etcd/peer.key --endpoints=https://127.0.0.1:2379 member list
Should get you output like:
3c06d56f4e8193e0: name=k8sn3 peerURLs=https://192.168.1.54:2380 clientURLs=https://192.168.1.54:2379 isLeader=false
3cc1193e53313d05: name=k8sn2 peerURLs=https://192.168.1.55:2380 clientURLs=https://192.168.1.55:2379 isLeader=false
a7447908c6035378: name=k8sn1 peerURLs=https://192.168.1.52:2380 clientURLs=https://192.168.1.52:2379 isLeader=false
efd47b5d63640666: name=k8sn4 peerURLs=https://192.168.1.53:2380 clientURLs=https://192.168.1.53:2379 isLeader=true
You can then remove a specific node
kubectl exec -it -n kube-system etcd-k8sn1 -- etcdctl --cacert=/etc/kubernetes/pki/etcd/ca.crt --cert=/etc/kubernetes/pki/etcd/peer.crt --key=/etc/kubernetes/pki/etcd/peer.key --endpoints=https://127.0.0.1:2379 member remove a7447908c6035378
In order to specify the UEFI boot parameters in a UCS boot policy you need to be using one of the following disk types
- SAN LUN
- iSCSI LUN
- Local LUN
In this example we will be booting to a RedHat Virtualization Host (RHVH) in UEFI mode with SAN boot
Configure a boot policy to point to your disk type, in this case SAN then add the UEFI parameters as follows
Examples screenshots are using the 3.2 version of the UCS interface (HTML5), so they may look a bit different if using the old Java client
- Select the Servers tab
- Expand Servers -> Policies
- Expand Boot Policies and select your boot policy
Example:
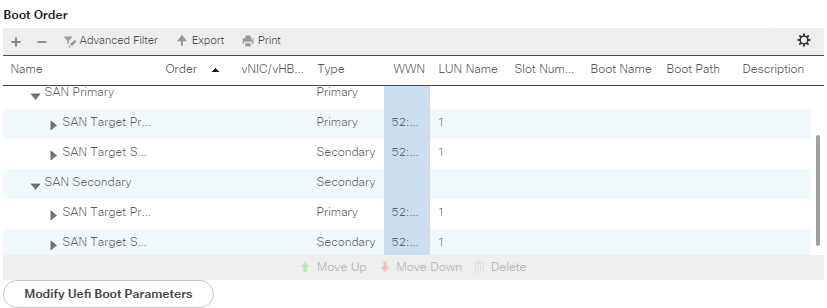
- Select the LUN/Disk in the Boot Order list
- Click Modify/Set Uefi Boot Parameters
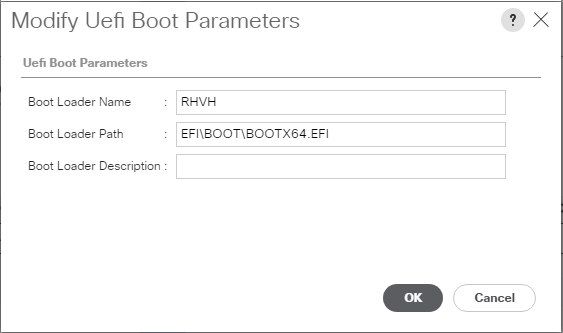
- For RHVH, set the following (This will be the similar for other Linux distros besides the name)
- Boot Loader Name: RHVH
- Boot Loader Path: EFI\BOOT\BOOTX64.EFI
Example:
Do base 10 arithmetic in bash instead of octal
((newvar = 10#$var + 10))
Remove leading zeros in bash
newvar=${var#0}
Find processes & threads for users (useful if running into nproc limits)
ps h -Led -o user | sort | uniq -c | sort -n
Show threads per process for user bob
ps -o nlwp,pid,lwp,args -u bob | sort -n
Delete files when rm/bash says too many arguments
No xargs
find . -name '*.pdf' -exec rm {} +
Using xargs
find . -name "*.pdf" -print0 | xargs -0 rm
Pretty tree of processes
ps -eo 'pid,args' --forest
Scan/re-scan a fibre channel adapter and scsi host
FC host
echo 1 > /sys/class/fc_host/host/issue_lip
SCSI host
echo "- - -" > /sys/class/scsi_host/host/scan
Individual disk
echo 1 > /sys/class/scsi_disk/0\:0\:0\:0/device/rescan
Check for open tcp ports from bash without telnet or nc
Replace <hostname> and <port> with your host and port you are checking
timeout 1 bash -c "cat < /dev/null > /dev/tcp/<hostname>/<port>"
Check the return result (echo $?) afterward and if it is 0 we had a successful connection, 1 means there was an error connecting before the timeout expired, 124 means the timeout expired and there was no connection
Display info from istheinternetonfire.com in a pretty way
Requires cowsay and the lolcat ruby gem (gem install lolcat)
case $- in *i*)dig +short txt istheinternetonfire.com | cowsay -f moose | lolcat; esac
Show connection settings for a single port
ss -tnl '( sport = :80 )'
Check for network stats on a system. Look here for things such as SYN overflow.
netstat -s
Tar and compress files with multiple threads. -T0 makes it use all threads available.
tar -c -I 'xz -T0' -f file.tar.xz <files>
There doesn't seem to be a way to install LVM directly to a raw device in the CentOS/RedHat installer. With a little bit of custom kickstart we can make it do it.
This assumes you have two drives connected to your system, one for boot and one for the system (I'm using VMs, so this is as simple as adding two disks). This also assumes that the disk device names are sd*, so make adjustments according to your system.
My Setup
1st disk - 2GB for boot
2nd disk - 30GB for OS
%pre section of config
In your kickstart config you will need a %pre section that does the following in order:
1. Creates an LVM physical volume on the device. This does a force (-ff) and overwrites any data there so be careful. -y just tells pvcreate to say yes to any "are you sure" messages.
2. Creates an LVM volume group named vg_system on the physical volume
This is all being redirected to /dev/tty1 so you can see the output during %pre
%pre
pvcreate -y -ff /dev/sdb &> /dev/tty1
vgcreate vg_system /dev/sdb &> /dev/tty1
%end
Main section of config
In this main section of your config you will need something similar to this, adjust for the partitions and sizes you want.
In order, this will:
1. Wipe out sda and initialize the disk if new
2. Put a single boot partition on it that fills the drive
3. Tells the kickstart to use the existing volume group created in the %pre
4. Creates a logical volume in the volume group for root (/) that fills the disk asside from swap
5. Creates a logical volume in the volume group for swap of 4GB
clearpart --drives=sda --initlabel --all
part /boot --fstype=ext4 --size=1 --grow --ondisk=sda
volgroup vg_system --useexisting
logvol / --fstype=ext4 --name=lv_root --vgname=vg_system --grow --size=1024
logvol swap --name=lv_swap --vgname=vg_system --grow --size=4096 --maxsize=4096
If you don't have a base kickstart config to work with look on a CentOS/RedHat box in root's home directory for an anaconda-ks.cfg which is the kickstart equivalent of how that system was installed
Pre-requisites
Make sure the hostname of the system is set correctly and all firewalls and selinux are disabled (Or configured for the ports specified at the bottom)
Install the packages
pam-devel is necessary if you want to build libnss_winbind.so.2 and use pam/winbind for local auth
yum -y install gcc make wget python-devel gnutls-devel openssl-devel libacl-devel krb5-server krb5-libs krb5-workstation bind bind-libs bind-utils pam-devel ntp openldap-devel ncurses-devel
Download and compile Samba
You can replace -j3 with n+1 CPUs you have available on the system.
wget https://www.samba.org/samba/ftp/stable/samba-4.3.1.tar.gz
tar xvzf samba-4.3.1.tar.gz
cd samba-4.3.1
./configure --enable-selftest
make -j3 && make -j3 install
Run Samba domain creation and configuration
This will create your domain as domain.com using bind as the backend and setting rfc2307 attributes in AD so you can store and retrieve UID/GID in AD.
/usr/local/samba/bin/samba-tool domain provision --realm=domain.com --domain=DOMAIN --server-role=dc --dns-backend=BIND9_DLZ --adminpass "myadpassword" --use-rfc2307
Create an init script for Samba
Edit /etc/init.d/samba4
#! /bin/bash
#
# samba4 start and stop samba service
#
# chkconfig: - 90 10
# description: Activates/Deactivates all samba4 interfaces configured to start at boot time.
#
# config: /usr/local/samba/etc/smb.conf
### BEGIN INIT INFO
# Provides:
# Required-Start: $local_fs $network
# Required-Stop: $local_fs $network
# Should-Start:
# Short-Description: start and stop samba service
# Description: start and stop samba service
### END INIT INFO
# Source function library.
. /etc/init.d/functions

if [ -f /etc/sysconfig/samba4 ]; then
. /etc/sysconfig/samba4
fi

RETVAL=0
CWD=$(pwd)
prog="samba"
prog_path="/usr/local/samba/sbin"
lockfile=/var/lock/subsys/$prog

start() {
        #Samba is already running, exit
        [ -e $lockfile ] && exit 1
        #Start service
        echo -n $"Starting $prog: "
        daemon $prog_path/$prog
        RETVAL=$?
        echo
        [ $RETVAL -eq 0 ] && touch $lockfile
        return $RETVAL
}
stop() {
        # Stop service.
        echo -n $"Shutting down $prog: "
        killproc $prog_path/$prog
        RETVAL=$?
        echo
        [ $RETVAL -eq 0 ] && rm -f $lockfile
        return $RETVAL
}

# See how we were called.
case "$1" in
        start)
                start
                RETVAL=$?
                ;;
        stop)
                stop
                RETVAL=$?
                ;;
        status)
                status smbd
                status samba
                RETVAL=$?
                ;;
        restart|reload)
                stop
                start
                ;;
        *)
                echo $"Usage: $0 {start|stop|restart|status}"
                exit 1
esac

exit $RETVAL
chmod 755 /etc/init.d/samba4
Configure Bind/DNS
Configure Bind to allow recursion (external resolving) to local subnets and point to the kerberos key that the samba-tool command generated. Also include the Samba Bind database.
acl "trusted" {
        192.168.1.0/24;
        127.0.0.0/8;
        ::1/128;
};
options {
        listen-on port 53 { any; };
        allow-query { any; };
        tkey-gssapi-keytab "/usr/local/samba/private/dns.keytab";
        allow-recursion {
                /* Only trusted addresses are allowed to use recursion. */
                trusted;
        };
        notify yes;
};
include "/usr/local/samba/private/named.conf";
/usr/local/samba/private/named.conf looks like below. CentOS 6 comes with Bind 9.8 which is the default.
dlz "AD DNS Zone" {
    # For BIND 9.8.0
    database "dlopen /usr/local/samba/lib/bind9/dlz_bind9.so";

    # For BIND 9.9.0
    # database "dlopen /usr/local/samba/lib/bind9/dlz_bind9_9.so";
};
Start named and make sure it is on by default
chkconfig named on
/etc/init.d/named start
Change /etc/resolv.conf to point to itself for DNS
domain domain.com
nameserver 127.0.0.1
Configure kerberos
edit /etc/krb5.conf. Case is important on the REALM here
[libdefaults]
        default_realm = DOMAIN.COM
        dns_lookup_realm = true
        dns_lookup_kdc = true
Configure NTP
Edit /etc/ntp.conf. I commented out the IPv6 stuff as it was causing errors in the logs, not necessary but makes the log nicer.
Note the sections on ntpsigndsocket and mssntp, these are required for Windows machines to successfully sync time with this AD server.
restrict default nomodify notrap nopeer noquery
#restrict -6 default nomodify notrap nopeer noquery

# Permit all access over the loopback interface.  This could
# be tightened as well, but to do so would effect some of
# the administrative functions.
restrict 127.0.0.1
restrict -6 ::1

ntpsigndsocket /usr/local/samba/var/lib/ntp_signd/

# Hosts on local network are less restricted.
restrict 192.168.1.0 mask 255.255.255.0 nomodify notrap kod nopeer mssntp

# Undisciplined Local Clock. This is a fake driver intended for backup
# and when no outside source of synchronized time is available.
server  127.127.1.0     # local clock
fudge   127.127.1.0 stratum 10

server 0.gentoo.pool.ntp.org version 3 prefer
server 1.gentoo.pool.ntp.org version 3 prefer
server 2.gentoo.pool.ntp.org version 3 prefer
server 3.gentoo.pool.ntp.org version 3 prefer

# Drift file.  Put this in a directory which the daemon can write to.
# No symbolic links allowed, either, since the daemon updates the file
# by creating a temporary in the same directory and then rename()\'ing
# it to the file.
driftfile /var/lib/ntp/drift

# Logging
logfile /var/log/ntp
logconfig =syncevents +clockevents
Start ntpd and make sure it is on by default
chkconfig ntpd on
/etc/init.d/ntpd start
Start it up
Start samba4 and make sure it is on by default
chkconfig samba4 on
/etc/init.d/samba4 start
Firewall
Open the following ports:
UDP 53, 123, 135, 138, 389
TCP 88, 464, 139, 445, 389, 636, 3268, 3269
53 - DNS
88 - Kerberos
123 - NTP
135 - RCP
138 - NetBIOS
139 - NetBIOS session
389 - LDAP
445 - MS directory services
464 - Kerberos passwd
636 - SSL LDAP
3268 - Global catalog
3269 - SSL Global catalog